This shop has been compensated by Collective Bias, Inc. and its advertiser. All opinions are mine alone. #GiveExtraGetExtra #CVS #CollectiveBias

I can never find my pack of gum in the bottomless pit I carry around called a purse. I love gum. But the excavating dig through receipts, random kid-stuff, pens, markers and lip-gloss makes it incredibly difficult to find my gum when I want it.
Well, I just solved my problem.

A cute wall-hanging, mason jar plaque so that I can grab a stick of gum as I head out the door! And it isn’t hard to make. I even have the printable of my text to make it easy.
To Make this Hanging Mason Jar Gum Holder You Will Need:
- A Wooden Wall Plaque
- Mason Jar – pint size, wide mouth
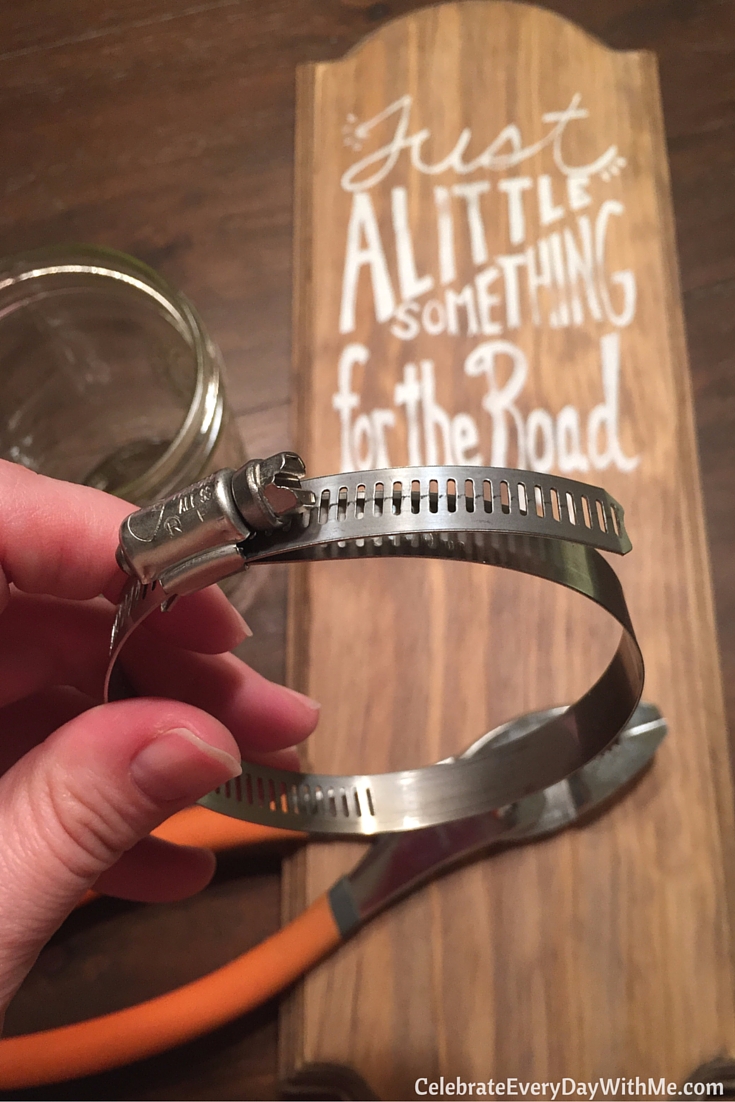
- Metal Clamp (I picked mine up at the home improvement store. It is the clamp that goes on a dryer hose.)
- Stain, Brush & Rag
- White Acrylic Paint & Brush
- Chalk, Pencil, Permanent Marker
- White Paint Marker – Fine Point
- Painter’s Tape
- Fine Sanding Paper
- Clear Spray Paint
- Tin Snips or Pliers
- Hammer and Nail
- Drill
- Screwdriver and One Screw
- A Sawtooth Picture Hanger
- Gum. Lots of it! (I used the new Extra® 35-stick pack. More gum to go around!)
- And here is a coupon to Save $1.00 on the new 35-stick pack of Extra®.
Let’s begin!

First, brush the stain onto the wood and wipe it off with a rag. I did this twice for a richer color. Allow the stain to dry completely.

If you are like me and want an aged look to the wood, you will need to white wash the wood before moving on. To do this, mix a little white acryllic paint with water. There is no right or wrong as to the ratio of paint to water; it is simply your preference.

Paint the white wash mix onto the wood and wipe off. Work in segments, otherwise the paint will dry before you can remove excess with your rag. You can see in the picture above that the white wash is giving a beautiful worn look to the stain.

Be sure to get the sides as well! Set aside your wood to dry and let’s take a look at the text.

If you want to create your own fun hand-lettering, this is your chance. But if you’re looking for something simpler, you can download a copy of my text here: Just A Little Something For The Road – free printable.

Cut the text into a rectangle and place it on the board. To help determine the placement, use the mason jar as a guide to show available space.

Once determined, mark the four sides of your paper with chalk.

Then, flip over your text and begin to chalk on the black letters as shown above. We are making a guide for writing with the paint marker in a later step.

Put your paper back in place on the wood and tape a couple edges down with painter’s tape. Then with your pencil, trace the outline of the black letters. You are pushing down and creating chalk lines on the wood. Take care to stay within the black lettering.
Do this for the entire text.
Now you have created a guide.

Use your fine point white paint marker to outline the text. Don’t try to fill in everything or your hands may wipe off too much of the chalk as you work. Outline first and then go back and fill in with the paint marker.

With fine sand paper, wear off some of the fresh paint. How much you sand depends on your personal preference.

And don’t forget to sand the corners of the wood. We’re giving it a little wear.

Seal your work with a clear coat of spray paint. Now you’re ready for mounting the jar!

Size your clamp to fit the jar and then cut off some of the excess metal ring. Tin snips will work best but bending back and forth with pliers will also do the job.

Next, mark the clamp where the screw should go with a permanent marker. You will need to pound a nail through the metal with a hammer.

Then, mark your hole for placement on the wood.

Pre-drill the hole for the screw and then with a screwdriver and screw, attach the clamp to board.


Attach the sawtooth picture hanger to back of the wood. Now you can put your mason jar in the clamp!

All that is left is to fill the jar with gum.
I picked up Extra® Gum Spearmint and Extra® Gum Polar Ice® at CVS. The Extra® 35-stick packs mean more gum for my whole family. And I love the durable, recycled packaging. Seriously, I already have ideas brewing as to what I can do with the empty gum cases!


I used about a pack and half which should last us quite awhile. Now, we have as much gum as we want right at our fingertips. Give extra, get extra.

I hung my DIY gum holder on the wall next to the lockers in the mudroom. We can all grab a piece of gum as we head out the door.


Just a little something for the road to solve my bottomless purse problem!
Here is where to find Extra® Gum at CVS, right next to checkout.

Do you have a bottomless purse too? Tell me, what fills up your bag?
If you’re looking for more inspiration with Extra®, click here!
 My name is Kristen. I'm a former Wedding & Event Planner blogging about fun ways to celebrate each and every day and the special occasions of life. Here you'll find inspiration for family fun, children's activities, party planning and a faith-filled life.


I am in love with this decorative must-have! I love vintage stuff so I want to also make one for my home now! #Client
Amy, it is very practical and looks so fun on my wall. I’m grabbing gum all the time! 🙂
This is adorable! I’m not sure, but I think I’m really close to trying one of your fantastic projects and finally get over my DIY crafting fear! Thanks for sharing!
You can do it, Kim! I know it. 🙂